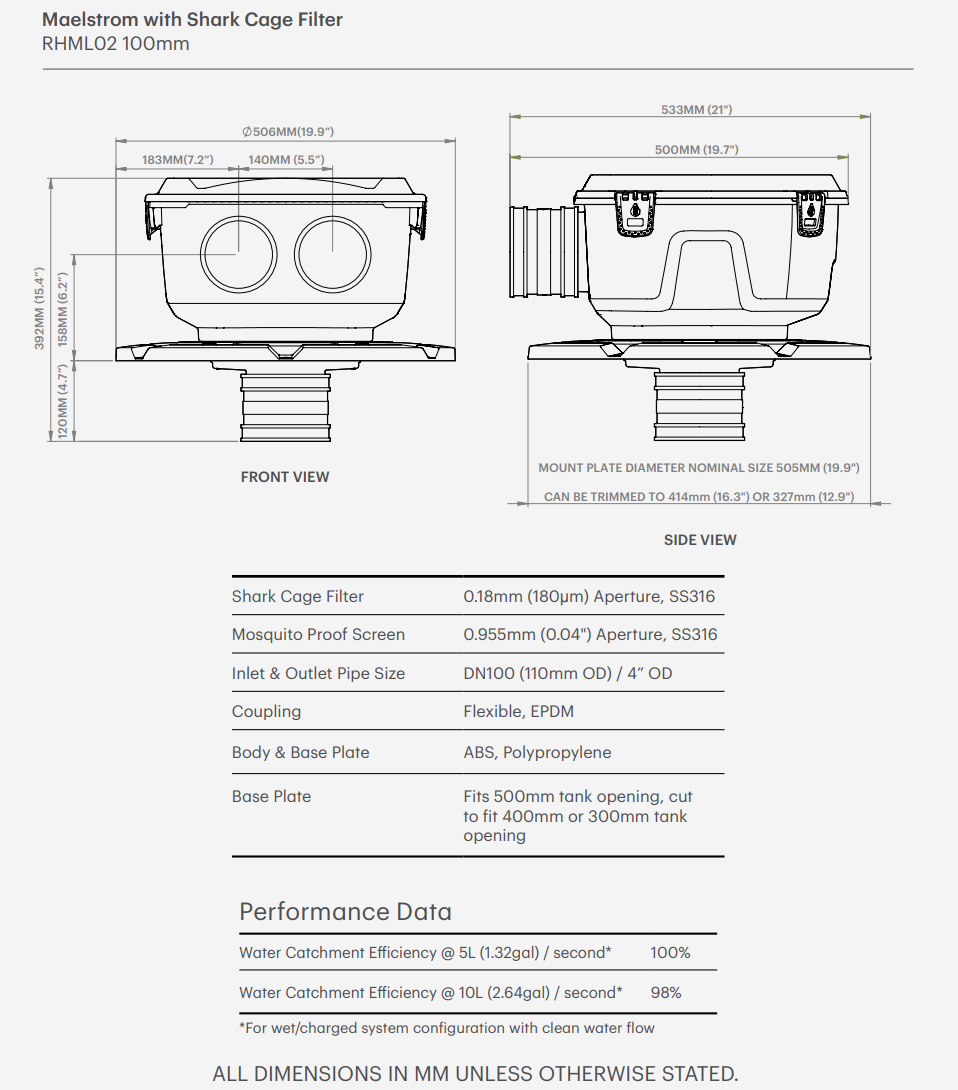
Rain Harvesting 100mm Maelstrom Filter
Our best ever rainwater filter just got better.
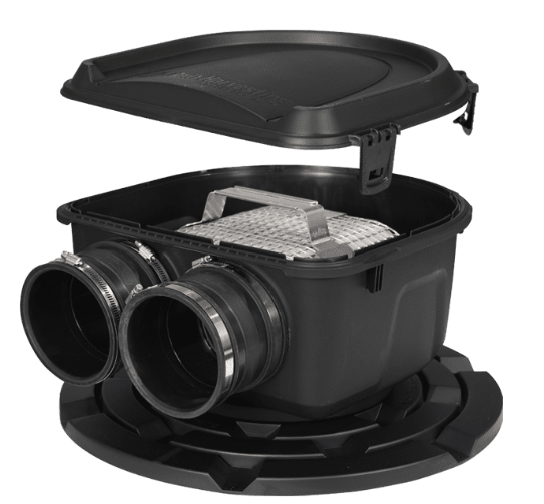
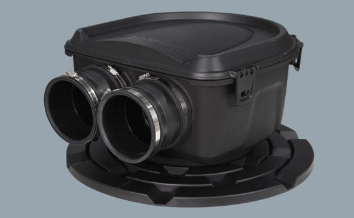
The Maelstrom with Shark Cage Filter builds on our original Maelstrom design, with an unmatched water catchment efficacy.
The Shark Cage filter effortlessly filters massive amounts of water to give you the best quality water in your tank. It’s even better than the standard Maelstrom – the super fine stainless steel mesh screen allows leaves and debris to be pushed out of the way which means less splashing and more water capture.
The single skin screen is also far easy to maintain, so you can keep your system performing at it’s peak.
Stringently tested and developed to ensure the absolute maximum in rainwater capture and leaf rejection, the Maelstrom with Shark Cage Filter offers the same level of super-fine filtration that the original Maelstrom does, with the added bonus of a significant increase in water capture, to deliver more water to your rainwater tank.
Inclusions:
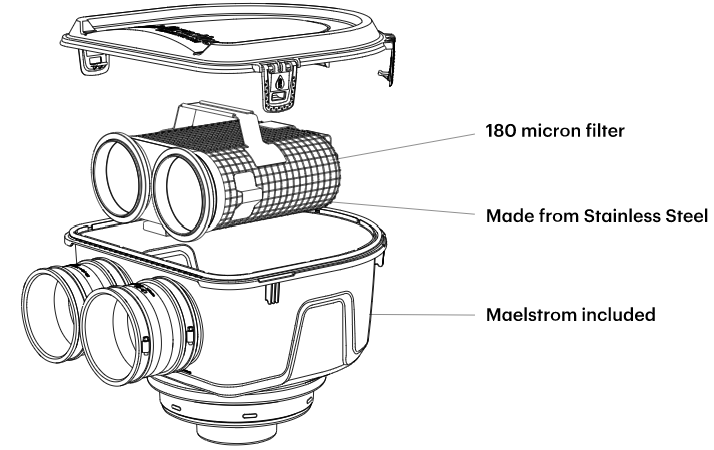
- Maelstrom filter with Shark Cage
- 3 flexible couplings (two on Maelstrom and one in box)
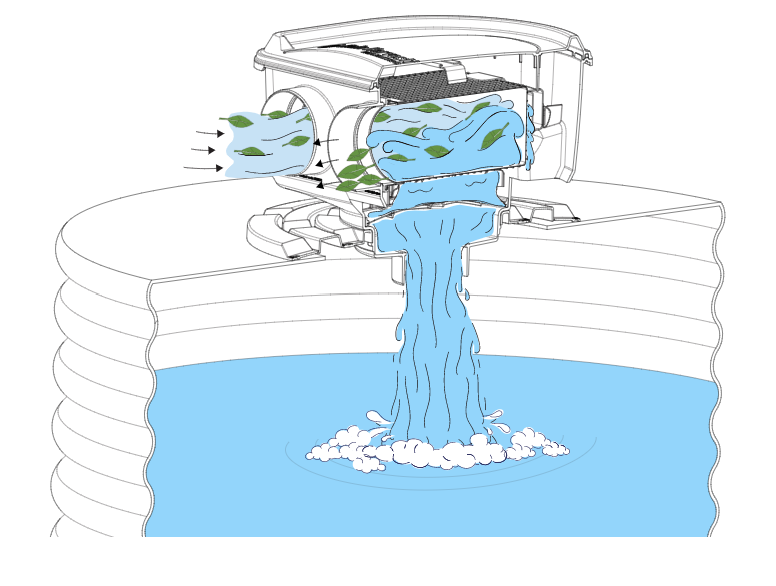
How it Works
Water enters the system through an inlet, before filtering through the super fine Shark Cage Filter.
The unique design of the filter knocks the energy out of the water, allowing it to then fall into your tank.
Leaves and debris are pushed to the side, and in many instances will wash out the dirty water outlet on the top, providing a level of self cleaning.
Huge water catchment with incredibly fine filtration.
FEATURES & BENEFITS
• A single point, tank-top filter with a ground breaking stainless steel shark cage design
• The 180 micron filter screens particles 5 times smaller than is achieved with a standard tank screen
• Reduces the hassle of cleaning leaf and debris build-up through Self-flushing
• Blocks out light that supports algae growth.
• Is a versatile product, able to be installed in a variety of pre-tank locations
• Reduces frequency and cost of tank cleaning by lowering common sediment build up through cleaner tank water
• Mounting plate fits 300mm, 400mm and 500mm tank openings, or can be used for mounting in-tank, on wall or in a pit
High water catchment
The Maelstrom with Shark Cage Filter delivers large volumes of clean rainwater to your tank, giving you unrivalled performance and rainwater catchment. By preventing leaves, debris and other unwanted materials from entering your rainwater system, water can move through your downpipes faster, more freely and without blockages. With less inhibitors in your system, you will capture more rainwater.
Super-fine rainwater filtration
The Maelstrom with Shark Cage Filter will filter rainwater to 180 micron to deliver high-quality, clean water directly to your storage tank, making it ready for use. The unrivalled, super-fine filtration of the Maelstrom with Shark Cage Filter provides you with the comfort and peace of mind in knowing that your rainwater catchments will be receiving superb filtration to prevent unwanted particles and matter from entering your system.
Easy to maintain
The Maelstrom with Shark Cage Filter can be very quickly and easily cleaned, reducing overall maintenance and helping to keep your system intact. The single skin, stainless steel mesh filter can be easily removed for fast cleaning, keeping leaves and debris out of your system entirely. Easily reattached when cleaning is complete, your system will stay working as required and deliver you plenty of clean rainwater.
Installation Guide
Tools you may need
- Screwdriver
- 6 screws for mounting to your tank
- Utility knife
- Marker pen
- Tape measure
- Brackets (wall mount or in-tank mount)
- Drill and Hole saw (pit mount or in-tank mount)
- 600mm/24″ stormwater pit (pitmount)
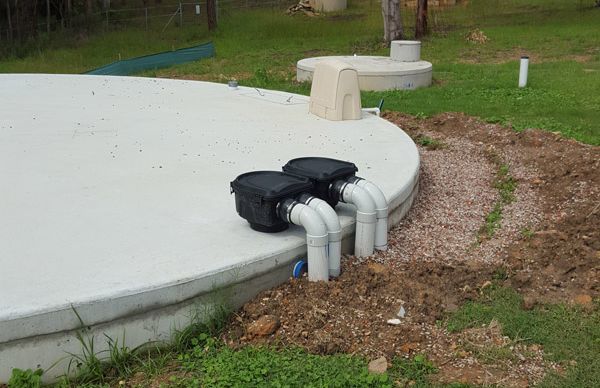
Tank Top Mount
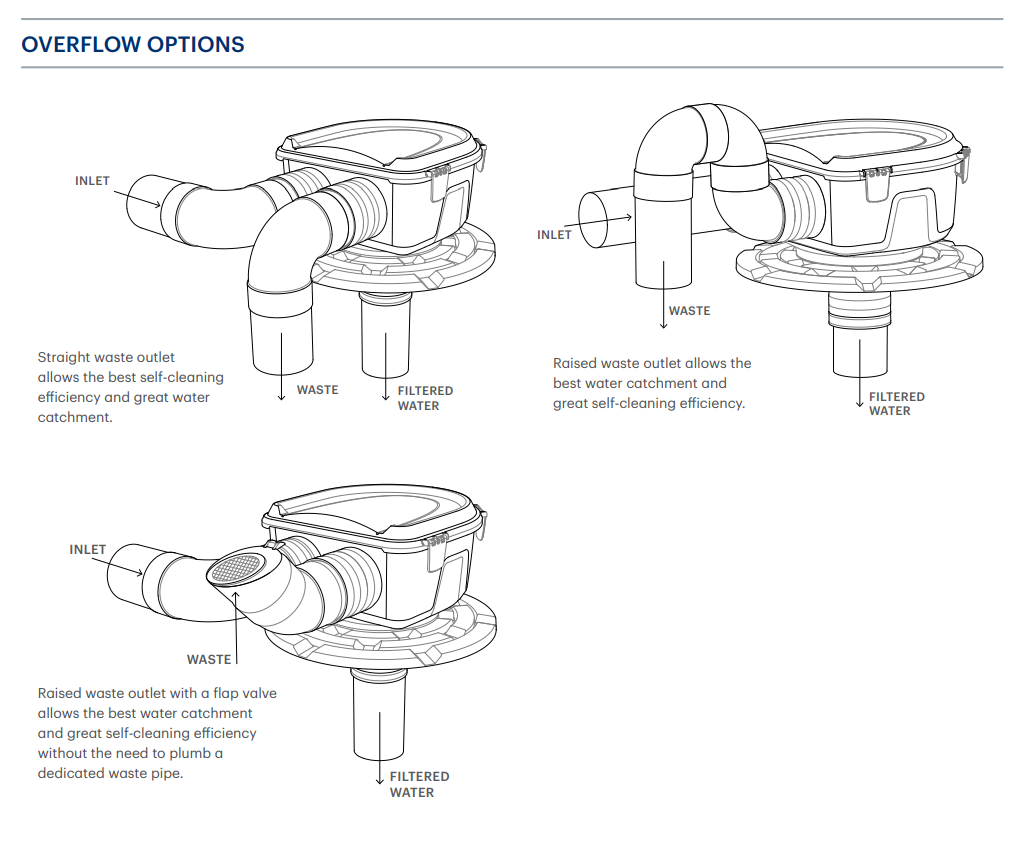
- Determine which port on your Maelstrom’s symmetric U-bend you want to use for your water inlet and which port you want to use for your waste outlet. The filter works equally effectively in either direction, so assign each port depending on what’s most convenient for your chosen installation point.
- Remove the existing tank screen from the opening of your rainwater tank by unscrewing and pulling it out and off the tank.
- Snap your Maelstrom out of the mounting plate.
- Turn your Maelstrom’s mounting plate upside down and, using your removed tank screen as a guide, trim to the nearest size by cutting in the channel as indicated. Ensure that once cut, the screw points on the mounting plate will still allow you to screw through the mounting plate into the top of the tank to provide a mosquito – proof seal.
- Centre the mounting plate over your tank inlets and screw it to your tank top.
- Remove the 100mm flexible coupling from the filtered water outlet (F), or you may wish to cut away the filtered water outlet from your Maelstrom in the cut channel provided to expand the outlet size and allow more water to enter your tank than the standard 100mm outlet. This is recommended if your rain harvesting system is designed to harvest 100% of your roof catchment area or if you’re in an area that experiences high peak flows during rain events.
- Snap your Maelstrom in place through the opening in the mounting plate.
- Loosen the hose clamp on your chosen water inlet port. Measure and cut your inlet pipe and connect it so it fits within your chosen inlet port, then tighten the hose clamp around it.
- Loosen the hose clamp on your chosen waste outlet port. Where practical, we recommend plumbing the overflow outlet so that it directs excess water and debris to
stormwater. Alternatively, you can cap your waste outlet with a vented flap valve. - Whichever outlet option you choose, measure and cut your outlet pipe, insert it in your chosen outlet port, then tighten the hose clamp around it.
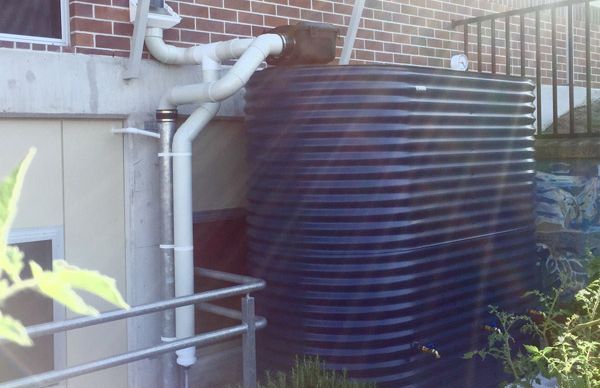
Wall Mount
- Determine which port on your Maelstrom’s symmetric U-bend you want to use for your water inlet and which port you want to use for your waste outlet. The filter works equally effectively in either direction, so assign each port depending on what’s most convenient for your chosen installation point.
- Select appropriate brackets that can support your Maelstrom’s mounting plate.
- Install the brackets on your wall so that they’re positioned to sit 102mm (4″) below your pipework and at least 260mm (10.2″) apart so there’s enough clearance for your Maelstrom’s filtered water outlet.
- Snap your Maelstrom out of the mounting plate.
- Screw the mounting plate to the brackets, ensuring it is centred.
- Snap your Maelstrom in place through the opening in the mounting plate.
- Loosen the hose clamp on your chosen water inlet port. Measure and cut your inlet pipe as required and connect it so it fits within your Maelstrom’s inlet port, then tighten the hose clamp around it.
- Loosen the hose clamp on your chosen waste outlet port. Where practical, we recommend plumbing the overflow outlet so that it directs excess water and debris to stormwater. Alternatively, you can cap your waste outlet with a vented flap valve.
- Whichever outlet option you choose, measure and cut your outlet pipe, insert it in your chosen outlet port, then tighten the hose clamp around it.
- Loosen the hose clamp on the filtered water outlet. Measure and cut an additional length of pipe to connect your filtered water outlet to your rainwater tank. Insert it inside the filtered water outlet and tighten the hose clamp around it.
- For best results, we recommend plumbing the other end of this pipe directly into your rainwater tank.
In Tank
- Check that your assembled Maelstrom (including flexible couplings and mounting plate) will fit within your tank riser. There must be enough space to allow the clips on the lid to open and for the inlet and outlet pipes to be connected to your Maelstrom.
- Identify the location of any existing inlets through the riser and use this to determine the height at which your Maelstrom will be positioned. The filter works equally effectively in either direction, so depending on what’s most convenient for your chosen installation point, you can assign either port on your Maelstrom’s symmetric U-bend as the water inlet or waste outlet.
- Select appropriate brackets that will support your Maelstrom and install them inside the riser at least 260mm (10.2″) apart so there’s enough clearance for your Maelstrom’s outlet.
- Mark where the outlet port will be located on the tank riser and use a hole saw to create the hole.
- Snap your Maelstrom out of the mounting plate.
- Screw the mounting plate to the brackets, ensuring it is centred.
- Remove the 100mm flexible coupling from the filtered water outlet (F), or you may wish to cut away the filtered water outlet from your Maelstrom in the cut channel provided to expand the outlet size and allow more water to enter your tank than the standard 100mm outlet. This is recommended if your rain harvesting system is designed to harvest 100% of your roof catchment area or if you’re in an area that experiences high peak flows during rain events.
- Snap your Maelstrom in place through the opening in the mounting plate.
- Loosen the hose clamp on your chosen water inlet port. Measure and cut your inlet pipe, insert it inside the tank riser and connect it so it fits within your chosen inlet port, then tighten the hose clamp around it.
- Loosen the hose clamp on your chosen waste outlet port. Where practical, we recommend plumbing the overflow outlet so that it directs excess water and debris to stormwater. Alternatively, you can cap your waste outlet with a vented flap valve.
- Whichever outlet option you choose, measure and cut your outlet pipe, insert it in the tank riser and your chosen outlet port, then tighten the hose clamp around it.
Stormwater Pit Mount (Filter Pit)
- If desired, your Maelstrom can be installed below ground level in an appropriately sized stormwater pit.
- Determine the position of where your filtered water pipe will exit the pit and mark this position. The pipe can exit on either of the four sides or through the base. If exiting through the side wall you may wish to use a 90 degree bend to directly connect your pipe to the Maelstroms coupling.
- Determine the position your inlet and waste pipes will penetrate the sides of the pit wall and mark. STORMWATER PIT MOUNT (600MM/24″)
- Mark the position of the support rod holes. Support rods should be approx. 108mm (4.25“) below the bottom of the inlet/waste pipes and approx. 300mm (11.8”) apart to allow adequate support of the mounting plate.
- Drill out all penetration holes as required and deburr.
- Install and tighten threaded rod and appropriate nuts and washers to both inside and outside of pit wall for both supports. It is recommended to use stainless steel or galvanised components.
- Position the pit in place and install the filtered water pipe allowing for the required length to enter the coupling. Seal around the pipe and pit wall using appropriate sealant.
- Lower the Maelstrom in place ensuring the coupling is positioned over the filtered water pipe and tighten the hose clamps.
- Install the inlet and waste pipes through the pit wall and into the Maelstroms coupling. Tighten the hose clamps and seal around the pipes and pit wall using appropriate sealant.
- It is recommended to install the pit with an appropriate lid to prevent water ingress.
FAQ
How often should I clean my Maelstrom’s filter screens?
Every environment is different, so the necessary frequency for cleaning your filter screens will vary. We recommend checking your Maelstrom filter regularly after installation to determine the rate at which debris accumulates. You can then use this information to make an informed decision about cleaning frequency. Depending upon your needs and situation, you may determine that cleaning is required monthly, quarterly, after each heavy downpour, or at a different frequency.
Do I need to modify the tank inlet when installing my Maelstrom?
No. Your Maelstrom is supplied with an adjustable flange that is designed to accommodate existing 300mm, 400mm and 500mm inlets. Simply remove the existing tank screen and trim the flange to suit the size of your inlet hole.
What head height is required when installing my Maelstrom on the inlet side of a wet or “charged” system?
Your Maelstrom filter should be installed no less than 500mm above the inlet of the tank.
When the Maelstrom overflow is connected to an outlet, for example, a stormwater discharge, the wet system head height can be reduced to accommodate low head systems. Collection efficiency is traded-off against low head height filtration.
What is the Maelstrom’s maximum flow rate?
On a wet rain harvesting system, your Maelstrom can handle water flowing at 10 litres (2.64 gallons) per second with a water catchment efficiency of 96%. It can handle water flowing at 5 litres (1.32 gallons) per second with a 99% water catchment efficiency for wet systems. Above 10 litres (2.64 gallons) per second, your Maelstrom will direct excess water to the outlet port (overflow).
Used in a wet rain harvesting system, your Maelstrom will yield 99% filtered water catchment at 5L/sec and 96% filtered water catchment at 10L/sec.
Are replacement filter bags available?
Yes. Replacement filter bags are available for your Maelstrom filter. The Maelstrom bag is designed to be reusable and can be washed and reinstalled. In the unlikely event that your bag is damaged or lost, replacements are available from Blue Mountain Co.
Can I connect multiple pipes or “lines” to my Maelstrom?
Multiple pipes can be consolidated before they reach your Maelstrom filter. However, it is important to assess the impact of consolidating these pipes to ensure that your total system flow is not restricted.
Can I install 90mm pipe to my Maelstrom?
Yes. You can use a tapered reducer or LIT (level invert taper) to connect 90mm pipe to your Maelstrom’s DN100mm inlet and outlet ports.
Can I install inlet pipes to both side ports so I have two inlets rather than one inlet and one outlet?
No. We do not recommend installing inlet pipes to both side ports. It is important that one side port is dedicated to overflow to allow your Maelstrom to perform its self-cleaning function and prevent clogging.
Can I install a first flush before my Maelstrom?
Yes. First flush diverters can be installed before or after your Maelstrom filter. If you choose to install a first flush diverter upstream of your Maelstrom, make sure you install a screened rain head before the first flush diverter so it cannot be clogged with leaves and larger debris.
Can the Maelstrom be installed in the charged area of a charged system? Ie. Can the Maelstrom be positioned below the inlet of the rainwater tank.
No. Your Maelstrom filter is not designed to carry a head of water, as the filter uses a self-cleaning gravity feed action to discard debris from the flow of water.
However, you can install your Maelstrom filter on top of your tank in place of your tank screen (or beside your tank) as the final filtering point for your wet system.
What do I do if there is a significant amount of water coming out of the debris overflow of the Maelstrom?
Check the following:
- Check the blue internal filter if there is a large amount of debris
- Check the fine bag filter if there is a lot of fine debris
- Clean either of the above filters if required
If the rainfall event is extreme, it is possible for some unfiltered water to overflow from the debris overflow port. Refer to expected flow rates section.
How do I collect the maximum amount of water from my Maelstrom?
The best way to maximise the amount of captured water from the Maelstrom is to:
- Ensure the filters are maintained periodically
- An alternative setup for the debris overflow to maximise clean water catchment is to add a small upwards bend, which will help to slow the flow of water at the debris overflow – forcing the water through the Maelstrom’s filters. In this scenario, it is recommended to maintain your filters more regularly since the debris is forced to flow over the bend.